TurboScribe is an AI-powered transcription tool that converts audio and video files into text with high accuracy. It is developed and operated by TurboScribe Technologies. Leveraging advanced AI technology, it supports transcription in over 98 languages and offers features such as speaker recognition and background noise filtering. TurboScribe is developed and operated by TurboScribe Technologies, headquartered in Washington, D.C.
When I was working as a lab assistant last summer, one of my jobs was to transcribe the audio recording of part of the experiment process. I tried both Otter.AI and TurboScribe and found TurboScribe had a higher accuracy after manually proofreading the recording. That’s why I would choose TurboScribe here rather than Otter.AI.
In the context of a long and important meeting, such as public meeting of two political leaders, or a public philosophical debate, transcribing what they said as a record for further analysis can be important for the study of political science/ philosophy. And applying tools to do the transcription job is definitely more effective than doing the manual transcription. That’s why I believe this transcription tool has an important status in the work of Digital Arts & Humanities.
Step 1: LOG IN/ SIGN UP
Click SIGN UP if you don’t have an account yet, if you already have an account, then click LOG IN. I would recommend just using your google account to sign up, it is convenient.

Step 2: Upload Files & Choosing
To upload your audio recording file, click “Transcribe File” at the top right corner. Then you can either drag your file from the other windows or simply click “Browse files” to look for your targeting file in your database.

Step 3: More options to Consider
You need to identify what language is spoken in your audio file, and the transcription mode below. However, I would recommend “Whale mode” here, because it remains the highest accuracy. Although the other mode might be faster, but for the sake of any research purpose, accuracy is supposed to be prioritized.
By clicking Speaker Recognition & More Settings, you can label each section of the transcription with who is speaking. Or if the original language spoken is not English, but your target audience is English speakers, then clicking the second option will save you a lot of translation time, because it will directly transcribe the original audio language directly to English.

Step 4: Check and Proofreading Transcription
As the picture below demonstrates, TurboScribe will label the time in the recording each sentence was uttered by the speaker just in the front of each sentence. Inevitably, even the best AI will make some small transcription mistakes, so don’t forget to check and proofread the transcription line by line.

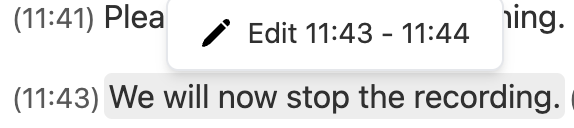
Step 5: Edit/ Correct Transcription
When you identify some transcription mistakes, click “Edit Transcript” on the right panel. The interface will not change, but when you hover your mouse over each sentence, the “Edit” tab will appear. Just click the tab and you can directly correct your sentence in this transcription interface.
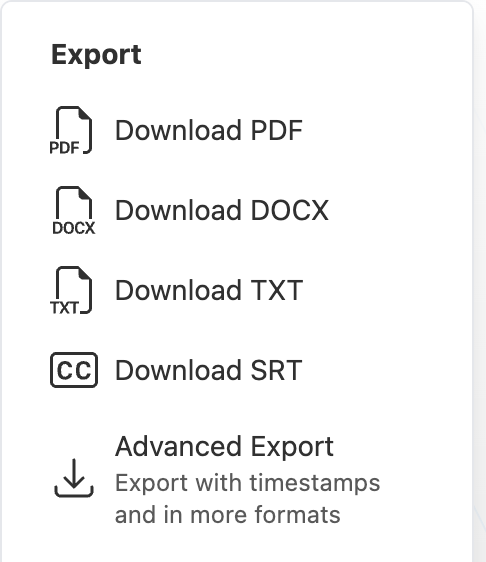
Step 6: Finish Transcription
When everything is done, go back the panel on the right, click the version you want to export as. Commonly speaking, PDF or DOCX will be the desired choices here.
More Resources
If you are still confused:
You can go to the official tutorial published by TurboScribe, or here is a more vivid video tutorial on how to convert audio to text step by step.
In my Human-Computer Interaction class this trimester, I have a lot of interviews that need to be transcribed and analyzed. The tool you mentioned is really useful. This trimester, I have been using Otter AI. It does a pretty good job in some areas, such as analyzing text, understanding meeting content, and capturing keywords. However, when it comes to transcribing speech, especially distinguishing different speakers, it doesn’t perform well. Every time, I have to spend an hour reviewing a 30-minute transcript to correct mistakes and adjust the speaker labels. I think the tool you introduced would be very helpful!